Roland Barthes Theory focuses around a number of set codes which he proposed are linked together in the production of all kinds of stories. There he postulated that all stories use the same 5 codes and that all genre signifier can be grouped under them to create narrative.
The 5 codes
1. Action code: depicts the events which take place in the narrative - the who, where, when of the story. Action codes are sequential.
2. Semantic code: refers to character and characterisation. The actions in the story are explained by the characters viewpoint on events.
3. Enigma code: involves the setting up of a mystery, its development and resolution.
4. Referential code: involves explaining of information. Mise-en-scene is a referential code.
5. Symbolic code: involves the reading of the connotations of signs which transform them into symbolic representations.
Action Codes:
Main character wakes up in the middle of nowhere
He cycles back to his house
He has dinner with his family which breaks into an argument
At night he sleepwalks out of his house
He sees a creature which tells him how long it is until the end of the world
A plane engine crashes into his house
Engima codes:
Why has the main character woken up in the middle of nowhere?
Why do his family appear to be frustrated with him?
Why has he sleepwalked towards a creature who tells him about the end of the world?
Why is the world ending?
How is he the only one who finds this creature?
How did a plane engine end up in his house?
Symbolic Codes:
The main characters lack of speech represents mystery and his inability to understand what is happening
The plane engine that crashes into the house is microcosm for the destruction of the world that is soon to come
Friday, November 6, 2009
Barthes Theory: Donnie Darko
Thursday, November 5, 2009
Analysis of opening sequences
i) What forms can opening sequences take? Can you list the conventional features of opening sequences?
Opening sequences always take on a different form. They are each unique and relevant to the film they are trying to introduce. Some work better than others but they all stick to the same conventions in order to achieve the desired effect. The main conventions of opening sequences are as follows:
Characters - The main characters are usually always introduced in an opening sequences. The hero/heroine is usually focused on more than any other character in order for the audience to connect with them. Details about the main character are established that will hint on events that may happen later in the film.
Setting - A wide establishing shot is usually the first thing seen in an opening sequence in order to establish the setting of the film. This is extremely important so the audience can can be drawn into the film. It also can give a massive hint to the genre of the film.
Plot - A key feature of an opening sequence is to introduce what may happen in the narrative of a film. Hints have to be made throughout to start get the audience guessing to as what may happen later in the film. This makes the audience hooked and makes them stay to watch the entirety of the film which is probably the main function of an opening sequence.
ii) What narrative functions of opening sequences can you identify?
Functions of an opening sequence:
- Establish main characters
- Establish genre
- To hook the audience
- Give hints to what may happen later in the film
- Establish the equilibrium at the beginning of the film
Audiences gain many things from watching an opening sequence. The first is a general idea of what the film is about. This includes the genre of the film and an audience member will easily be able tell if they are going to enjoy the film or not. A second gain from watching an opening sequence is for the audience to start relating to the characters. Emotional links should be made between the two so the audience can relate to the hero/heroines actions. Audiences also gain the ability to guess what may happen later in the film. This is key because they need to have something to look forward to/be scared of later in the film.
iv) What do film-makers gain from including an opening sequence?
From including an opening sequence the film maker gains the ability to hook the audience to their film in a short space of time. This makes the audience consume the entirety of the text and therefore film makers have achieved what they aim to do. Without an interesting opening the audience may quickly get bored and not watch a film leading to low ratings for the film and poor reviews from critics.
Wednesday, November 4, 2009
Levi-Strauss theory applied to 'Pale Rider' and 'Die Hard'
Pale Rider
Levi-Strauss stated that elements which give meaning in a story will be typically organised into binary opposites. Within this opening sequence there are many opposites relevant to the story which become apparent.
Villains/Village Folk: The villains are shown galloping mercilessly towards the village while the village folk are shown in a peaceful village area.
Conflict/Calm: Calm exists at the begining of the sequence but is then broken as the villains raid the village. During the conflict period there is chaos and panic and this opposite becomes very strong
Loud/Quiet: The villains are shown surrounded by noise as they gallop towards the village and the village folk are in a peaceful quiet area representing their innocence.
Dark/White horses: Villains have dark horses showing the darkness inside the, and the village folk have white horses showing their peace.
Safety/Danger: Safety is shown to be within the tranquility of their lives and danger is shown as the man enters the town in which he is made to leave
Miracles/Doubt: Girl is shown to be praying for a miracle which suggests something may happen, yet there is a lot of hope being lost due to how they seem to be suffering
Lone man/Group: When the man leaves his group he is shown to be in danger and he is shown to be safer when they are in a whole village group
Die Hard
Together/Apart: Woman and Husband shown to be constantly apart and just as they come together danger begins to form
Safety/Danger: Characters think they have safety but it is suddenly taken away from them which creates excitement in the narrative plot
California/New York: Main character seems to be comfortable in his home town of New York and as he enters California danger begins to emerge
Victims/Villains: Made very apparent from the beginning as the unsuspecting victims are trapped by villains
Life/Death: Victims will be fighting for life while the villains bring death
Friday, October 16, 2009
1. Who did you work with and how did you manage the task between you?
My group consisted of me, Dominic, Sheera and India. Initially in class we broke up the tasks between ourselves. Me and Dominic chose to act and India and Sheera split the filming between themselves. Since me and Dominic were acting we handled the script and the shot list/shooting schedule and India and Sheera handled the storyboard. We tried to split the tasks as evenly as possible to ensure the task was a learning experience for everyone in the group. I even managed to shoot a shot myself when i didnt have to be acting in it. At the end we split the editing evenly so again everyone gained experience from creating this continuity sequence.
2.How did you plan your sequence? What processess did you use? What theories did you take into account?
To plan the sequence we had two group meetings. The first of these was in a lesson in which we mostly disucussed everything involving roles and an theme for the sequence. Once this had been decided we started drawing up a story board. We did some run throughs beforehand to check all the camera framings and angles would work in our location of chpice. In the second meeting at lunch we finished off the story board and made our shot list/shooting schedule so we knew exactly which shots we were taking where. This made it much easier when it came to the filming of the sequence. In order to create this continuity sequence we took many rules and theories into account. As stated in the brief we had to demonstrate match-on-action, shot-reverse shot and the 180degree rule. This was all put into the sequence in order to create a sense of flow. There were other rules and techniques we used to ensure our sequence worked well such as very quick gapless editing and we made sure we didnt break the 30degree rule so it looked as if there were no short 'jumpy' cuts. A master shot was also used in the sequence so the audience know where the continuity sequence takes place and it helps re-establish taht throughout the sequence when it cuts back to it later on.
3. What technology did you use to complete the task, and how did you use it?
We had to use many pieces of equipment in order to create this continuity sequence. The first was a Canon Mini DV video camera. This was our main piece of equipment and was used to film every shot. This was operated by the cameraman/woman and was mounted on a tripod for every shot to ensure smooth non-shaky shots. To accompany this and record auido we used a shotgun microphone and headphones to try and get a reasonably good quality dialouge to accompany the shots. To capture and edit the sequence we used Adobe Premier Pro. We only usd the very basics of this program but it was enough to edit our sequence. We also used it to create titles for the begining of the sequence.
4. What factors did you have to take into account when planning, shooting and editing?
We had to take into account many factors when planning and shooting our sequence. The first obstacle to overcome was managing to create this sequence within the time limit we were given. We had an hour to plan, an hour to shoot and an hour to edit. This obviously restricted the complexity of the sequence so we decided to make it short and simple. The second thing we had to consider was the location of our shoot. This area had to have reasonable lighting since we decided not to use artificial lights, it had to have quite quiet sound levels so there would be no background noise when recording our audio and the location had to be accessible to us during school hours. From this we decided to use our media classroom. It was empty at the planned time of shooting and would have enough lighting due to there being many windows. While shooting our time limit was the main factor we considered. We had to limit the number of takes we could do of each shot in order to finish within the time limit. This meant we wouldnt be able to perfect all our shots but we did manage to correct the ones that went horribly wrong. Another thing to consider however was the continuity rules. We had to stick mainly to the 180degree rule while shooting to make our sequence look as proffessional as possible. When editing we had to try and split the task evenly between us. This meant constantly switching between tasks and perhaps slowed the editing process down slightly. Again we had to consider continuity techniques and try and make our cuts as tight as possible. With only an hour to edit everything had to be done in a brisk manner and this limited our ability to perhaps create perfect match-on-action between each cut.
Group 1D
Tuesday, October 13, 2009
Propp's theory analysis
Finding Nemo is a film telling the story of a fish (Marlin) searching for his lost son (Nemo). Marlin, recently widowed is an overprotective father and struggles to let Nemo out of his sight. Nemo disobeys his dad's orders and wonders into the Great Barrier Reef. As he does so he is captured and taken to a dentist's fish tank. The narrative tells the story of Marlin and his new found friend (Dory) searching for Nemo and also tells the story of Nemo trying to escape the fish tank.
Character Types in the Film:
Hero - Marlin
Villain - Little Girl
Victim - Nemo
Helper - Dory
31 functions of Propp's theory applied to finding Nemo:
No.1: Nemo is taken from home
No.2: Marlin tells Nemo not to leave leave the reef
No.3: Nemo leaves home anyway
No.8: Villain takes Nemo away
No. 11: Marlin leaves in search for Nemo
No.14: Marlin finds Dory (helper)
No.25: Nemo has to swim through the pipe
No. 30: Villain is punished because she loses her fish
Conclusion
Many of the functions in propp's theory apply to this film, however many don't. In my opinion this theory is probably slightly outdated because films nowadays tend to all change narrative theory structure in order to provide a different viewing experience and prevent predictability. As shown in Finding Nemo many of the functions do apply however they are slightly in the wrong order and many also do not apply. I think that no general formula will be able to apply to every film because every film is unique. There will always be elements of difference.
Thursday, October 8, 2009
Opening Sequence - Applying Todorov's Theory
The main antagonist is clearly shown in this opening sequence. He is introduced right at the beginning with the name of 'Sauron'. He is shown to be clearly evil in many ways. The narrator introduces him as 'the dark lord' and he is shown surrounded by fire and darkness. The protagonists are only shown towards the end of the opening sequence. The first, 'Bilbo Baggins', is introduced with a name and can been seen as a protagonist due to the innocence of his nature. The second is not introduced with a name but can be seen clearly as a protagonist because of the peace and bliss that surrounds him in the establishing shot. The title of the film is also shown as the first shot of him is shown which indicates it will focus around him.
This opening sequence is not very conventional because it first shows how things will be due to a disruption because it is narrating a past story. The equilibrium is only shown at the very end. The last shot is an establishing shot of a forest area. The protagonist is sitting by a tree and the camera pans round. he is calmly reading and the area is very luscious. Birds are tweeting and everything represents bliss and calm. Another shot shows a CU of the ring. This is significant because it shows that the equlibirum exists when the ring remains untouched. The lighting in this shot is very dark and everything about it looks very gloomy, this perhaps suggests that even in the equlibrium things are definitely not perfect.
The disruption is greatly hinted at throughout the whole opening sequence. The narrator tells a story of evil forces taking over the land due to a ring. This ring is found at the end of the opening sequence so we can assume that the equilibium is broken due to conflict arising again. The audience is made to think that the story the narrator told is bound to repeat itself and there will perhaps be more war.
The heroes journey can only be assumed to be a quest in which the protagonist must restore peace somehow. We can guess that this has something to do with the ring but we can't be sure of deatils or how he will go about doing this. From what we can see in this opening sequence i am guessing that the new restored equilibrium will be exactly as the first (peaceful lands with no war) but with many changed lives. Every hero will have completed a journey which will have perhaps changed their perception on everything. Maybe new alliances will be formed in order to restore this equilibrium but nothing is given away in the opening sequence.
Tuesday, October 6, 2009
Wednesday, September 30, 2009
DYM HW FEEDBACK
Your comparison was very well presented, and showed a clear understanding of the task and key media concepts. Your analysis is of a very high standard, especially the deconstruction of technical aspects. Well done, Tom.
Tuesday, September 29, 2009
Wednesday, September 23, 2009
Opening Sequence Comparisons
Comparing the opening sequence of 'Legally Blonde' and 'Seven'
Legally Blonde
Shot Types
- ECUs on different parts of main character - she is revealed bit by bit
- Occasional LS to get a feel for the area that the film is set in
- MS of the main character at the end to clearly show her to the audience
- CU shots of her materialistic possessions such as the Prada bag to show her wealth
- Overhead shots of the campus give us more of a sense of where this movie is taking place and helps establish the film
- Hobbies and Personality of Main Character revealed through the many possessions shows in the opening sequence
- Name of main character is revealed on the card that is passed under her door
- Looks very popular due to her many friends that rush to sign her card
- Everyone is wearing pink and are all doing make up which strongly suggests that they are all very 'girly girls'
- Everyone seems to be extremely wealthy due to the large house they are in and the posh looking area that they are in
- Upbeat music suggests that this is probably going to be a lively, fun film
- Shot of main character's boyfriend at the end shows that the narrative will probably be focused around relationships
- probably a very stereotypical film due to the characters already shown
Seven
Shots
- Initial LS inside to establish the setting of the house
- MS of two main characters so they are instantly recognisable and some of their personalities can be revealed
- CU of some of Morgan Freeman's personal possessions such as his glasses and metronome, these show that there is something different/mysterious about him
- LA shot showing Morgan Freeman and Brad Pitt walking with rain pouring down, audience aren't on the same level as the characters and having the rain pour down on the audience creates a sense of misery
- Freeman seems very isolated from everyone else, he is told that people don't want to be working with him anymore
- Wearing a trench coat which shows he is just like an old fashioned detective
- His morning routine is shows which shows that his character is very precise and likes to do things in a particular way
- Brad Pitt is wearing very casual clothing and chewing gum, shows he probably has a relaxed personality
- The way in which Pitt speaks to Freeman shows he has a lot of confidence
Narrative Expections
- Clips of newspaper filings and photos suggesting a murder mystery
- All colours are very grey and dark which hints that this could be a dark miserable film
- Most of the opening sequernce is silent which creates an eerie feel to the film
- Some inital conflict between Pitt and Freeman suggesting there may be more further in the film
Overall Comparison
'Seven' and 'Legally Blonde' both are completely different opening sequences. 'Legally Blonde' shows a bright, happy, almost unrealistic world where every boy and girl are ahppily getting along. From this it is easy to see that this film will be very lighthearted and joyful. 'Seven' starts off with dark miserable colours with a lot of silence which connotes an eerie depressing film. This contrast in the opening sequences is essential because both films are different genres. The genre of thriller/mystery comes across extremely well in 'Seven' and 'Legally blonde' is easily identified as an upbeat girly comedy.
Monday, September 21, 2009
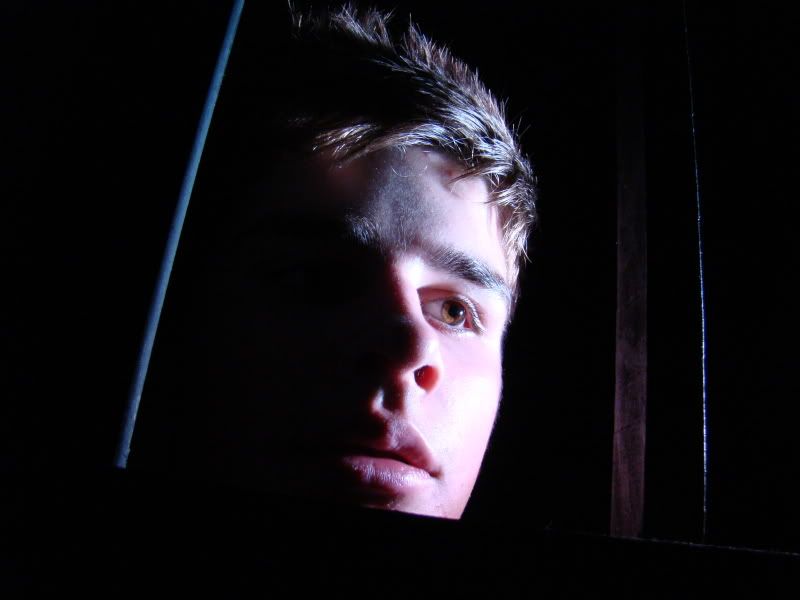 This shot is a CU of a male figure. He is looking away from the camera as if there was something to be worried about. It represents horror in many ways. the photo has quite an extreme quality about it; the lighting on his face and the framing of the shot. This limited lighting does just enough to show his facial expression but hides a lot creating mystery in the character. Although the character is fairly central and takes up most of the shot there is still some space around him to create an eery feel for the space he is in.
To achieve the horror effect many factors were carefully considered. The lighting has extreme contrasts within the shot. One side of the models face is lit up while the other half and background are completely dark. The framing is a CU which allows us to see the scared expression on the models face. there is also a slight tilt to the framing to represent abnormality within the shot. To achieve this tilt the camera was taken off the tripod and i had to use it carefully with a steady hand. Although it is slightly unclear, there are bars in the shot around the models face. this gives a sense that the model is trapped and creates more fear. Some zoom had to be used on the camera to get close enough to his face so his expression can be clearly conveyed to the audience and i had to crouch in order to get a bit of LA on the shot.
There are many things i like about this particular shot. I think the framing is perfectly balanced. The CU shows his face and emotion really well and leaves enough space for the dark areas around the model. the lighting on this shot is also very effective in my opinion. It lights up half of his face only so a sense of mystery is created. It also contrasts the light and dark really well so an element of extreme is created which further signifies the genre of horror.
If I were to do the shot again there are a few things i would change. Firstly i would try and the light to focus on the bars as well as the models face. This would show more clearly that the person in the shot is trapped in a frame within a frame already. I would also try and get the model to use a more extreme expression so it is clear to the audience that this person is scared and trapped. I may also change the framing slightly so that theres is even more tilt on the frame in order to make the shot stand out and more horror-like.